A tutorial on Jupyter Notebooks
Hi all, In this blog post we will explore Jupyter Notebooks, where you will learn an easy and convineant way to create and share a document that contains text, code, videos, equations and images
What are Jupyter Notebooks?
The notebook is a web application that allows you to combine explanatory text, math quuations, code, and visualizations all in one easily sharable document.
Notebooks have quickly become an essential tool when working with data. You’ll find them being used for data cleaning and exploration, visualization, machine learning.
Typically you’d be doing this work in a terminal, either the normal python shell or with IPython. Your visualizations would be in separate windows, any documentation would be in separate documents, along with the various scripts for functions and classes. However with notebooks, all of these are in one place and easily read toghether.
Literate programming
Notebooks are form of literate programming proposed by Donald Jnuth in 1984. With literate programming, the documentation is written as a narrative alongside the code.
Specifically in Donald Knuth’s words
Instead of imagining that our main task is to instruct a computer what to do, let us concentrate rather on explaining to human beings what we want a computer to do
How Notebooks work
Jupyter notebook is a brain chaild of IPython project started by Fernando Perez. IPython is an interactive shell, similar to the normal python shell but with the great features like syntax highlighting and code completion.

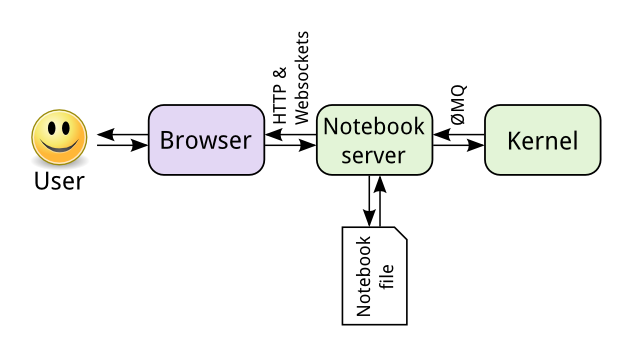
The central point is the notebook server. we connect to the server through our browser and the notebook is rendered as a web app. Code you write in the web app is sent through the server to the kernel. The kernel runs the code and sends it back to the server, then any output is rendered back in the browser.
When we save the notebook, it is written to the server as a JSON file with a .ipynb file extension.
The great part of this architecture is that the kernel doesn’t need to run python. Since the notebook and the kernel are separate, code in any language can be sent between them. For example, two of the earlier non-python kernels were for the R and Julia languages. With an R kernel, code written in R will be sent to the R kernel where it is executed, likewise python code running on python kernel.
The name Jupyter comes from the combination of Julia, Python, and R
Another benefit is that the server can be run anywhere and aceesssed via the internet. Typically we will be running the server on our own machine where all your data and notebook files are stored. But you can also set up server on a remote machine or cloud instance like amazon’s EC2.
Installing Jupyter Notebook
-
The jupyter notebooks automatically get installed with the Anaconda distribution. we will be able to use notebooks from the default environment
-
If you’re using simple Python Idle you can install jupyter notebook using pip command
#use either of the commands below to install notebook in cmd (command prompt)
pip install notebook
pip install jupyter notebook
To run the notebook, run the following command at the Command prompt (cmd)
jupyter notebook
Launching the Notebook Server
To start a notebook server using a command-line interface, open the cmd prompt, and navigate to the directory where you’d like to create notebook files(.ipynb).
you can confirm the present working directory using pwd in linux and cd in windows.
cd <directory path>
Next, enter the following command in your terminal
jupyter notebook
Unable to start the Jupyter Notebook Server?
Try troubleshooting the problem with the help if this post What to do when things go wrong?
Notebook Server
When you run the Jupyter Notebook command, the server home should open in your browser. By default, the notebook server runs at http://localhost:8888
Jupyter Notebook Server Tabs
The tabs at the top show Files, Running, and Cluster. The Running tab will list all the currently running notebooks.
Shutting down Jupyter
we can shutdown individual notebooks by marking the checkbox next to the notebook on the server home and clicking “Shutdown.” Make sure you’ve saved your work before you do this though! Any changes since the last time you saved will be lost. You’ll also need to rerun the code the next time you run the notebook.
You can shutdown the entire server by pressing control + C twice in the terminal. Again, this will immediately shutdown all the running notebooks, so make sure your work is saved!
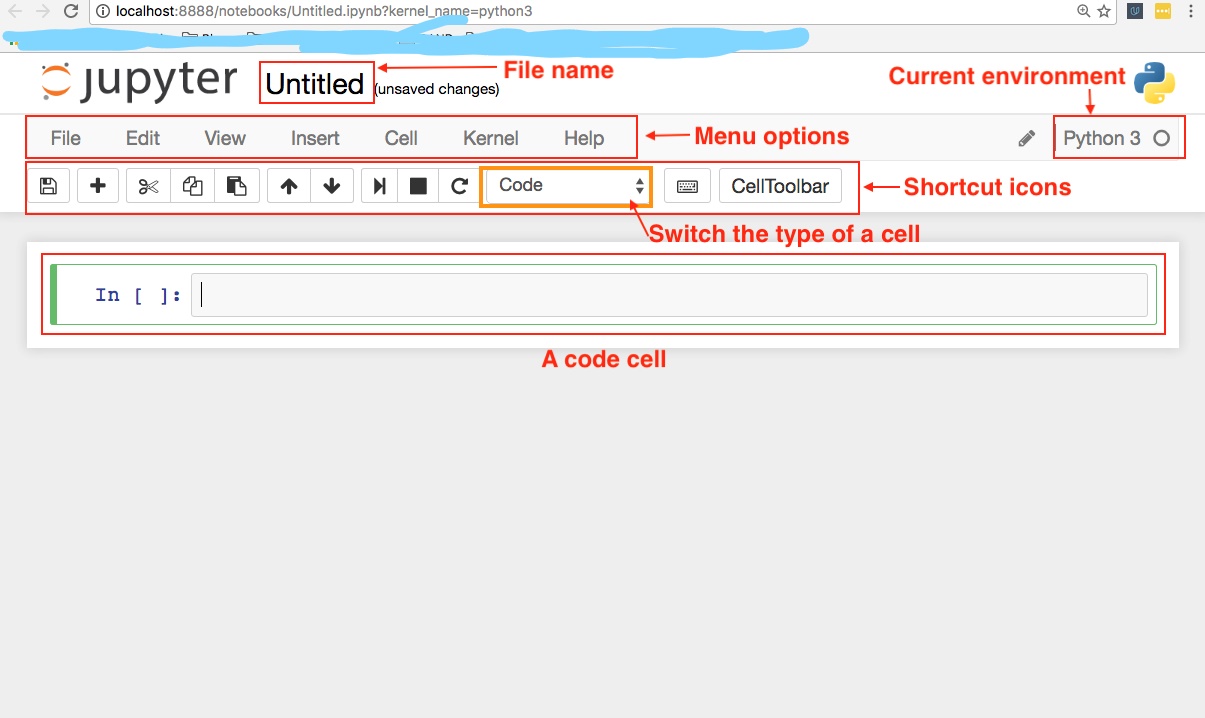
Notebook Interface
Code cells


Markdown cells
Markdown is a formatting syntax that allows you to include links, style text as bold or italicized and format code.
Math expressions
We can also create math expressions in Markdown cells using LaTeX symbols. Notebooks use mathJax to render the LaTeX symbols as math symbols.
To start math mode, wrap the LaTeX in dollar signs $y = mx + b$. For a math block, use double dollar signs.
To learn more about Markdown
Magic Keywords
Magic keywords are special commands you can run in cells that let you control the notebook itself or perform system calls such as changing directories. For example, we can set up matplotlib to work interactively in the notebook with %matplotlib
Magic commands are preceeded with one or two percent signs.
- Timing code
We can use %%timeit magic command to time how long it takes for a function to run
- Embedding visualizations
Usually we use matplotlib function for visualizations, and these visualizations are usually displayed in a new pop up window. Instead to embed these visualizations in the notebook we use %matplotlib inline
Converting Notebooks
Notebooks are just big JSON files with the extension .ipynb
Since notebooks are JSON, it is simple to convert them to other formats. Jupyter comes with a utility called nbconvert for converting to HTML, Markdown, Slideshows, etc.
The general syntax to convert notebook.ipynb file to another format is
jupyter nbconvert --to FORMAT mynotebook.ipynb
The curently supported output FORMAT could be either of the following (lowercase letters are written intentionally)
- html
- latex
- webpdf
- reveal.js html slideshow
- markdown
- ascii
- reStructuredText
- executable script
- notebook
for example, to convert a notebook to an HTML file, in your terminal use
# Install the package below, if not already
pip install nbconvert
jupyter nbconvert --to html mynotebook.ipynb
Creating a slideshow
The slides are created in notebooks like normal, but you will need to designate which cells are slides and the type of slide the cell will be. In the menu bar, click view ..> Cell Toolbar –> slideshow to bring up the slide cell menu on each cell.
Slides are full slides that you move through the left to right. Sub-slides show up in the slideshow by pressing up or down. Fragments are hidden at first, then appear with the button press. you can skip cells in the slideshow with skip and Notes leaves the cell as speaker notes
Running the slideshow
# Install the package below, if not already
pip install nbconvert
jupyter nbconvert notebook.ipynb --to slides
This just converts the notebook to the necessary files for the slideshow, but you need to serve it with an HTTP server (like chrome) to actually see the presentation
# Install the package below, if not already
jupyter nbconvert notebook.ipynb --to slides --post serve
This will open up the slideshow in your browser so you can present it.
Special thanks to the Mat Leonard for the instructions

